Projects
Organize your work into projects with documents, libraries, and team collaboration.
Projects are the primary way to organize your work in Fabric AI. They bring together documents, libraries, agents, and team collaboration in one place.
What is a Project?
A project is a container for related work:
- Documents — PRDs, specs, architecture docs generated by agents
- Libraries — Uploaded files that provide context for AI agents
- Artifacts — Pages Fabric Agent writes for this project
- Conversations — Chat history with agents about this project
- Settings — Project-specific configuration and templates
Use the project's Coding Instructions tab to share coding rules and connect Claude Code, Codex, or another coding tool. The guide covers repository setup, folder uploads, and reviewing changes.
Creating a Project
Navigate to Projects
Click Projects in the left sidebar.
Create New Project
Click Create Project and provide:
- Name — Descriptive project name
- Description — Brief summary of the project
- Template (optional) — Start from a template
Configure Settings
Set project preferences:
- Default Document Type — PRD, Spec, etc.
- Default Agent — Which agent to use
- Visibility — Personal or shared with organization
Start Working
Your project is ready! You can:
- Upload documents to the library
- Start a conversation with an agent
- Generate your first document
Project Structure
Working with Documents
Generating Documents
Open Project
Click on your project to open it.
Start Agent Chat
Click New Document or Chat to start a conversation with an agent.
Describe What You Need
Tell the agent what document you want:
Create a PRD for implementing OAuth 2.0 authentication.
Include user flows, API requirements, and security considerations.
Review and Edit
The agent generates a draft. You can:
- Edit directly in the rich text editor
- Request changes by chatting with the agent
- Accept/Reject suggested modifications
Save Document
Click Save to add the document to your project.
Document Types
Fabric supports various document types:
| Type | Description | Template Features |
|---|---|---|
| PRD | Product Requirements Document | Goals, features, success metrics |
| Technical Spec | Technical implementation details | Architecture, APIs, data models |
| Architecture | System architecture documentation | Diagrams, components, flows |
| API Spec | API documentation | Endpoints, schemas, examples |
| Proposal | Project proposals | Problem, solution, timeline |
Features are no longer created as a document. Recommend, review, and manage Features in the project's Roadmap instead; Features documents created earlier stay readable.
Document Editor
The built-in editor provides:
- Rich formatting — Headings, lists, code blocks
- Markdown support — Write in Markdown, render beautifully
- AI assistance — Inline AI suggestions and rewrites
- Diff highlighting — See changes clearly
- Version history — Track all changes
- Export — PDF, DOCX, Markdown
Project Libraries
Each project has a dedicated library for RAG context.
Uploading Documents
Drag and drop files or click to upload:
- Supported formats — PDF, DOCX, MD, TXT, code files
- Size limits — Up to 50MB per file
- Bulk upload — Multiple files at once
Using Context
When you chat with an agent in a project, it automatically has access to:
- All documents in the project library
- Previously generated documents in the project
- Any explicitly attached libraries
This means the agent understands your project context and can:
- Reference your existing documentation
- Maintain consistency across documents
- Build on previous work
Managing the Library
- Add files: Upload new documents anytime
- Remove files: Delete outdated documents
- Remove duplicates: An item whose content matches another item's is marked Duplicate of …; Remove duplicates deletes the extra copies and keeps the original
- Living Memory: Files a connected agent pushes from a working tree appear under Living Memory, grouped by folder, with each file's full path under its name
- Organize: Create folders for organization
- Search: Find specific documents quickly
Write Folders
When a project's Living Memory is synced from a repository, you can name write folders: folders in that repository where agents connected through the Fabric plugin save their files, such as specs and task notes. Fabric commits the files an agent writes there to the repository, and the next sync reads them back into Living Memory, where the next agent sees them.
To manage them, open the menu beside Sync now in the Living Memory section and choose Write folders.
- To add a folder, pick one in the tree, which shows only folders the sync selects, or type its path. Folders the sync leaves out, hidden folders such as
.github, and the folder your coding instructions are read from can't be write folders. Folders can't contain one another, and a project can have up to ten. - Each folder sets how its files land. Pull request (the default) opens a pull request against the synced branch, so someone reviews the files before they join it. Push directly commits straight to the branch with no review, and the next agent reads those files as they are. If another write lands on the branch first, Fabric retries the commit on the new branch tip; the write becomes a pull request only when the branch refuses the push (branch protection, a server hook, or missing write permission). Only project admins and owners can turn on Push directly, Fabric asks you to confirm, and the list shows who turned it on and when.
- Each folder also sets whether AI search uses its files. Index for AI search (the default) embeds the files, so project search and context summaries can use them. Store only keeps the files in Living Memory, readable in the Context tab, through the context tools and in the CLI mirror, but never embeds them, so AI search, keyword search and context summaries leave them out. In the Context tab each such file shows as Ready with a Store only label, and Context Readiness counts it as Ready, not as a source still processing. Use Store only for folders that will hold thousands of task or spec files, which would otherwise fill search and summaries with noise. A Store only badge marks such folders in the list. Changing the choice takes effect without a new sync: switching to Store only removes the folder's existing search data, and switching back embeds the files again (a large folder finishes over its next sync).
- You can change a folder's path, mode or search choice, or remove the folder. Removing a folder stops agents writing there, and its files are indexed again; files already written stay in the repository.
Members who can't add context can open the list but not change it.
Team Collaboration
Sharing Projects
Share projects with your organization:
- Open project settings
- Click Sharing
- Choose visibility:
- Private — Only you
- Organization — All org members
- Specific members — Selected individuals
Member Roles
| Role | Permissions |
|---|---|
| Owner | Full control, can delete project |
| Editor | Can create and edit documents |
| Viewer | Can view documents only |
Activity Feed
Track project activity:
- Document created by [User]
- Document edited by [User]
- Library document added
- Conversation started
Project Templates
Using Templates
Start from a template for faster setup:
- Click Create Project
- Select Use Template
- Choose from available templates
- Customize for your needs
Available Templates
- Feature Development — PRD, spec, stories
- API Project — API spec, documentation
- Research Project — Analysis, findings, recommendations
- Sprint Planning — Stories, tasks, estimates
Creating Templates
Create templates from existing projects:
- Open a project
- Click Settings → Save as Template
- Choose what to include:
- Document structure
- Default prompts
- Library organization
- Save the template
Project Settings
General Settings
- Name and description — Update project details
- Default agent — Which agent to use by default
- Default document type — Starting document type
Prompt Settings
Configure project-specific prompts:
- Override organization prompts — Use custom prompts
- Variable defaults — Pre-fill template variables
- Output preferences — Format, length, style
Integration Settings
Connect external tools:
- Jira — Sync stories and tasks
- GitHub — Link to repository
- Slack — Send notifications
Delegating Coding Runs to Fabric Agents
When your project is linked to a GitHub repository, you can delegate feature and task implementation directly to a Fabric Agents Remote Server (fabric-agent-server) or Fabric Agents Desktop (fabricagents://) using your existing subscription harnesses (Claude Max, Codex Plus/Pro, Cursor Pro, Factory Droid, Kimi Code, or Grok CLI) with zero per-token API fees.
The native execution bridge is opt-in (FABRIC_AGENTS_EXECUTION_BRIDGE_ENABLED=true on both the API and Temporal worker). See the deployment guide for operator cutover and rollback details.
Personal vs. Organization Remote Servers
You can register and switch between multiple Personal Servers and Organization Servers inside Project Settings → Implementation Defaults or directly inside the Send to Fabric Agents dialog when starting any coding run:
| Server Scope | Visibility & Access | Typical Setup |
|---|---|---|
Personal (PRIVATE) | Visible only to you within the project. Register as many personal machines as you use (e.g., My MacBook Pro (:9100), Linux Devbox (Tailscale)). | Runs on your workstation or personal devbox using your own signed-in CLI subscriptions (claude, codex, cursor, droid, kimi, grok). |
Organization (TEAM) | Shared with all authorized project members. Registered once by an organization admin or project editor. | Runs on a shared team VM or container (https://agents.example.com) with team service accounts or shared subscription seats. |
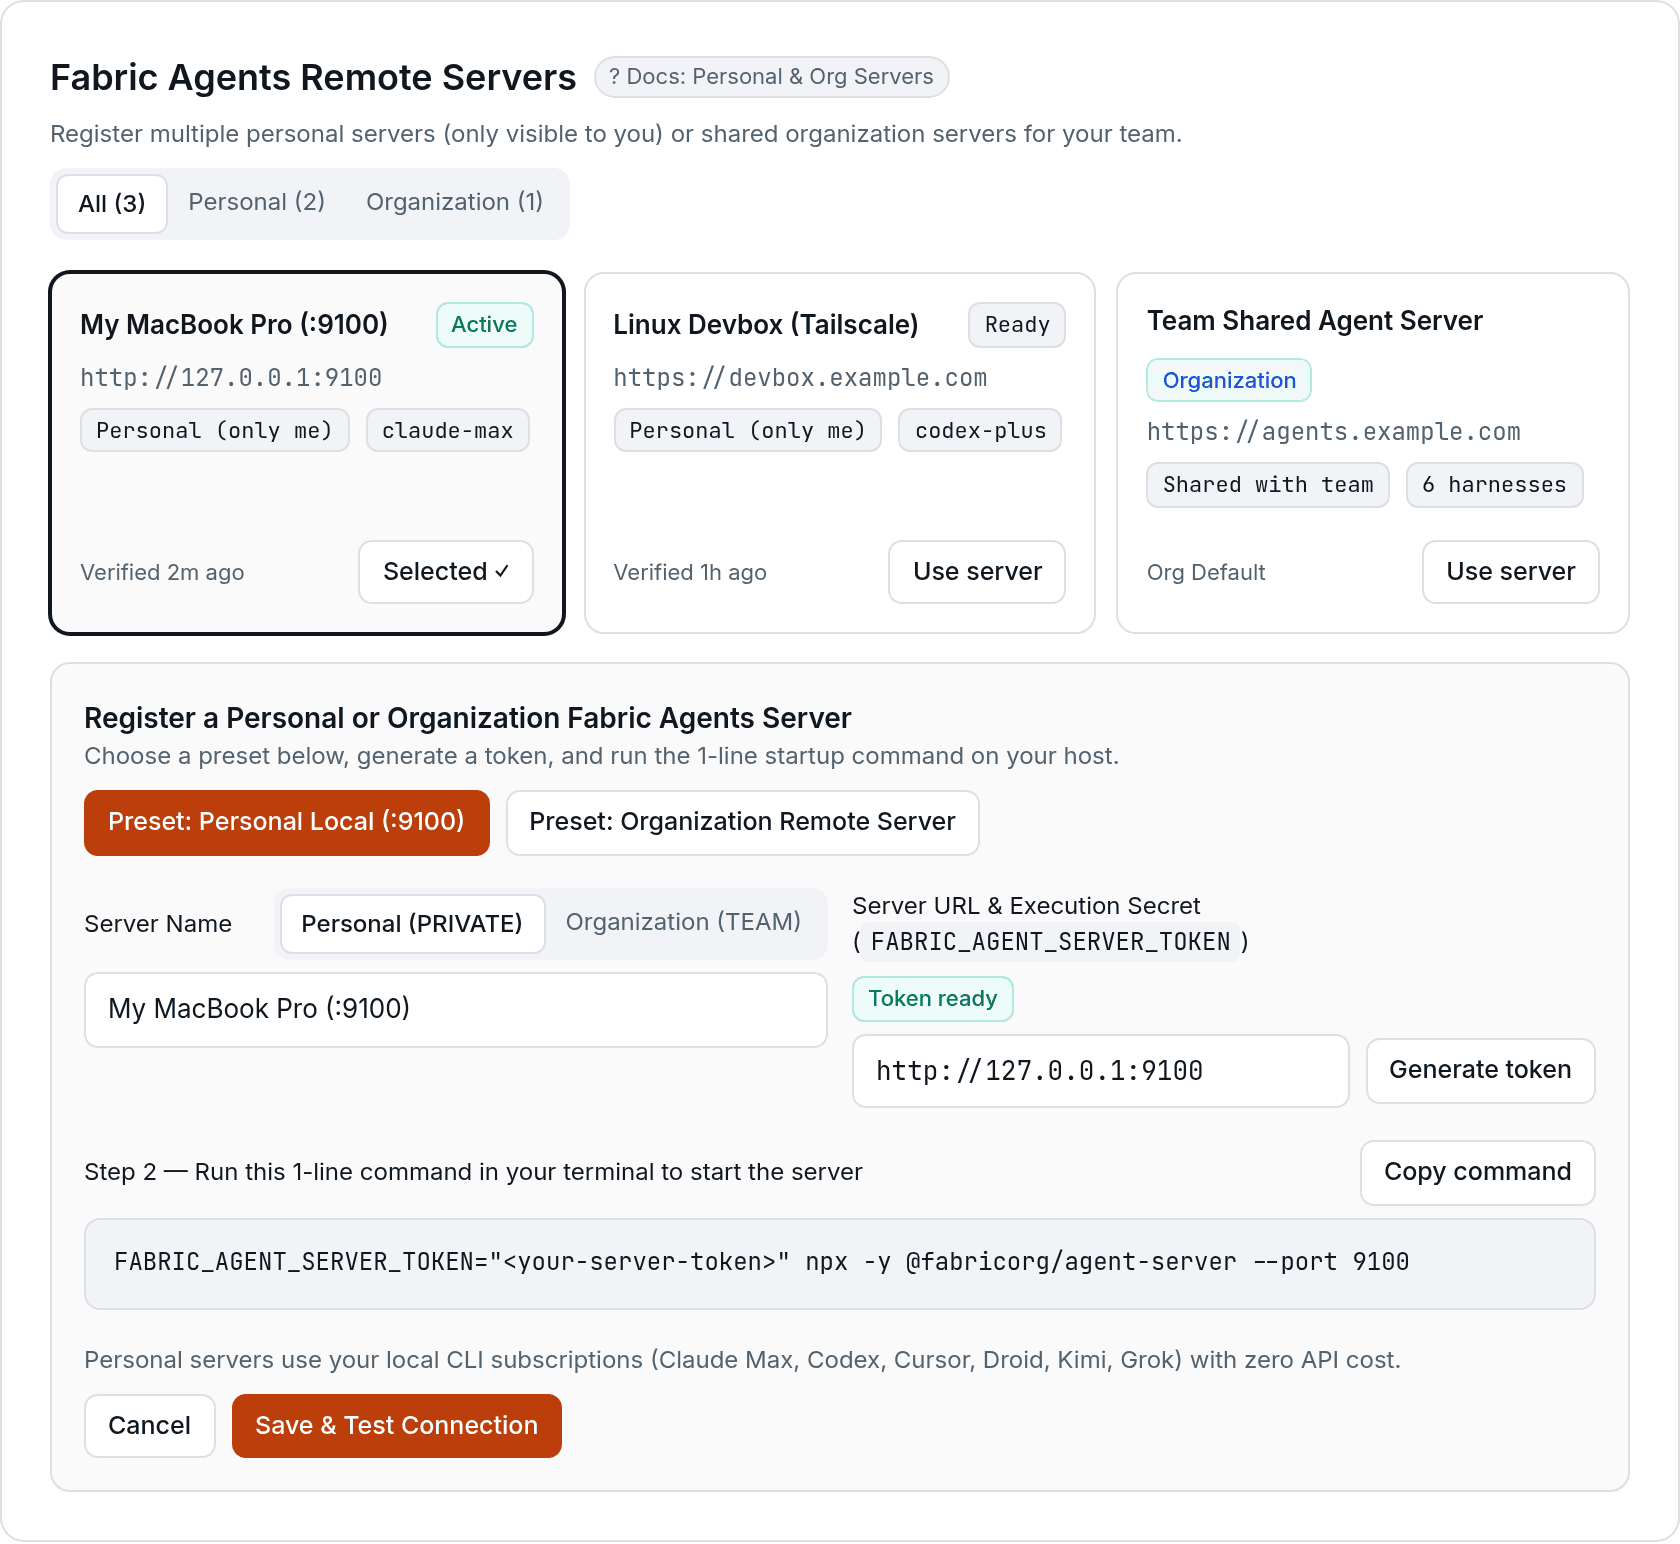
To register a server in one step:
- Open Send to Fabric Agents on any feature or task (or go to Project Settings → Implementation Defaults) and expand Register a personal or shared Fabric Agents server.
- Click Preset: Personal Local (:9100) (pre-fills
http://127.0.0.1:9100andPersonal (PRIVATE)) or Preset: Organization Remote Server (selectsOrganization (TEAM)). - Click Generate token to create a 64-character execution secret (
FABRIC_AGENT_SERVER_TOKEN). - Copy the generated Step 2 terminal command and run it on your host:
FABRIC_AGENT_SERVER_TOKEN="fab_srv_..." npx -y @fabricorg/agent-server --port 9100 - Click Save & Test Connection to verify
/healthand select the server.
Triggering a Coding Run
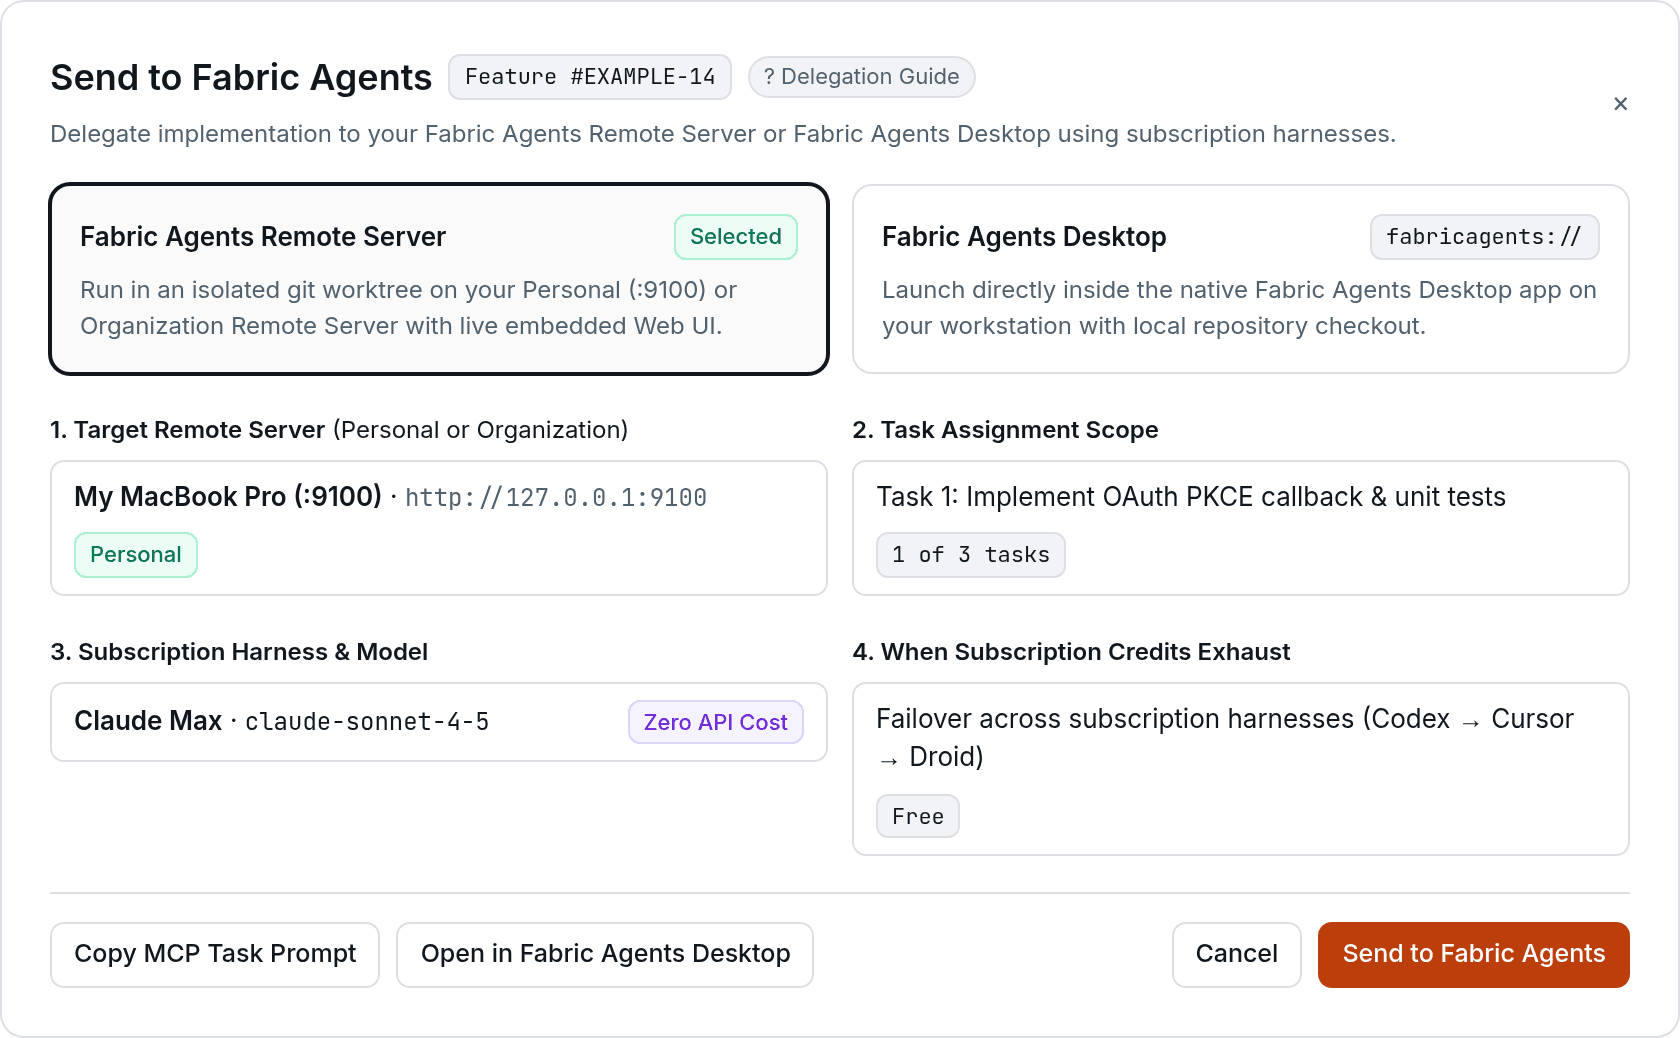
Open a published feature in the Roadmap tab and click Start Work → Send to Fabric Agents… (or click Send to Fabric Agents on an individual story card or task row):
- Choose Execution Target: Select Fabric Agents Remote Server (executes in an isolated git worktree on your selected Personal or Organization server) or Fabric Agents Desktop (launches directly in your local desktop app via
fabricagents://). - Select Target Remote Server: Pick any of your registered Personal or Organization servers from the visual cards.
- Select Task Assignment Scope: Implement the entire feature (all open tasks) or assign a single primary task. When you select a task that specifies its own repository or branch, Fabric automatically targets that repository and branch.
- Choose Subscription Harness & Quota Fallback: Pick Claude Max, Codex, Cursor, Factory Droid, Kimi, or Grok, and choose whether exhausted subscription credits should failover across your other subscription harnesses (Free) or fall back to an organization API key.
- Click Send to Fabric Agents (or Copy MCP Task Prompt / Open in Fabric Agents Desktop).
Viewing the Live Server Web UI Inside the Fabric Portal
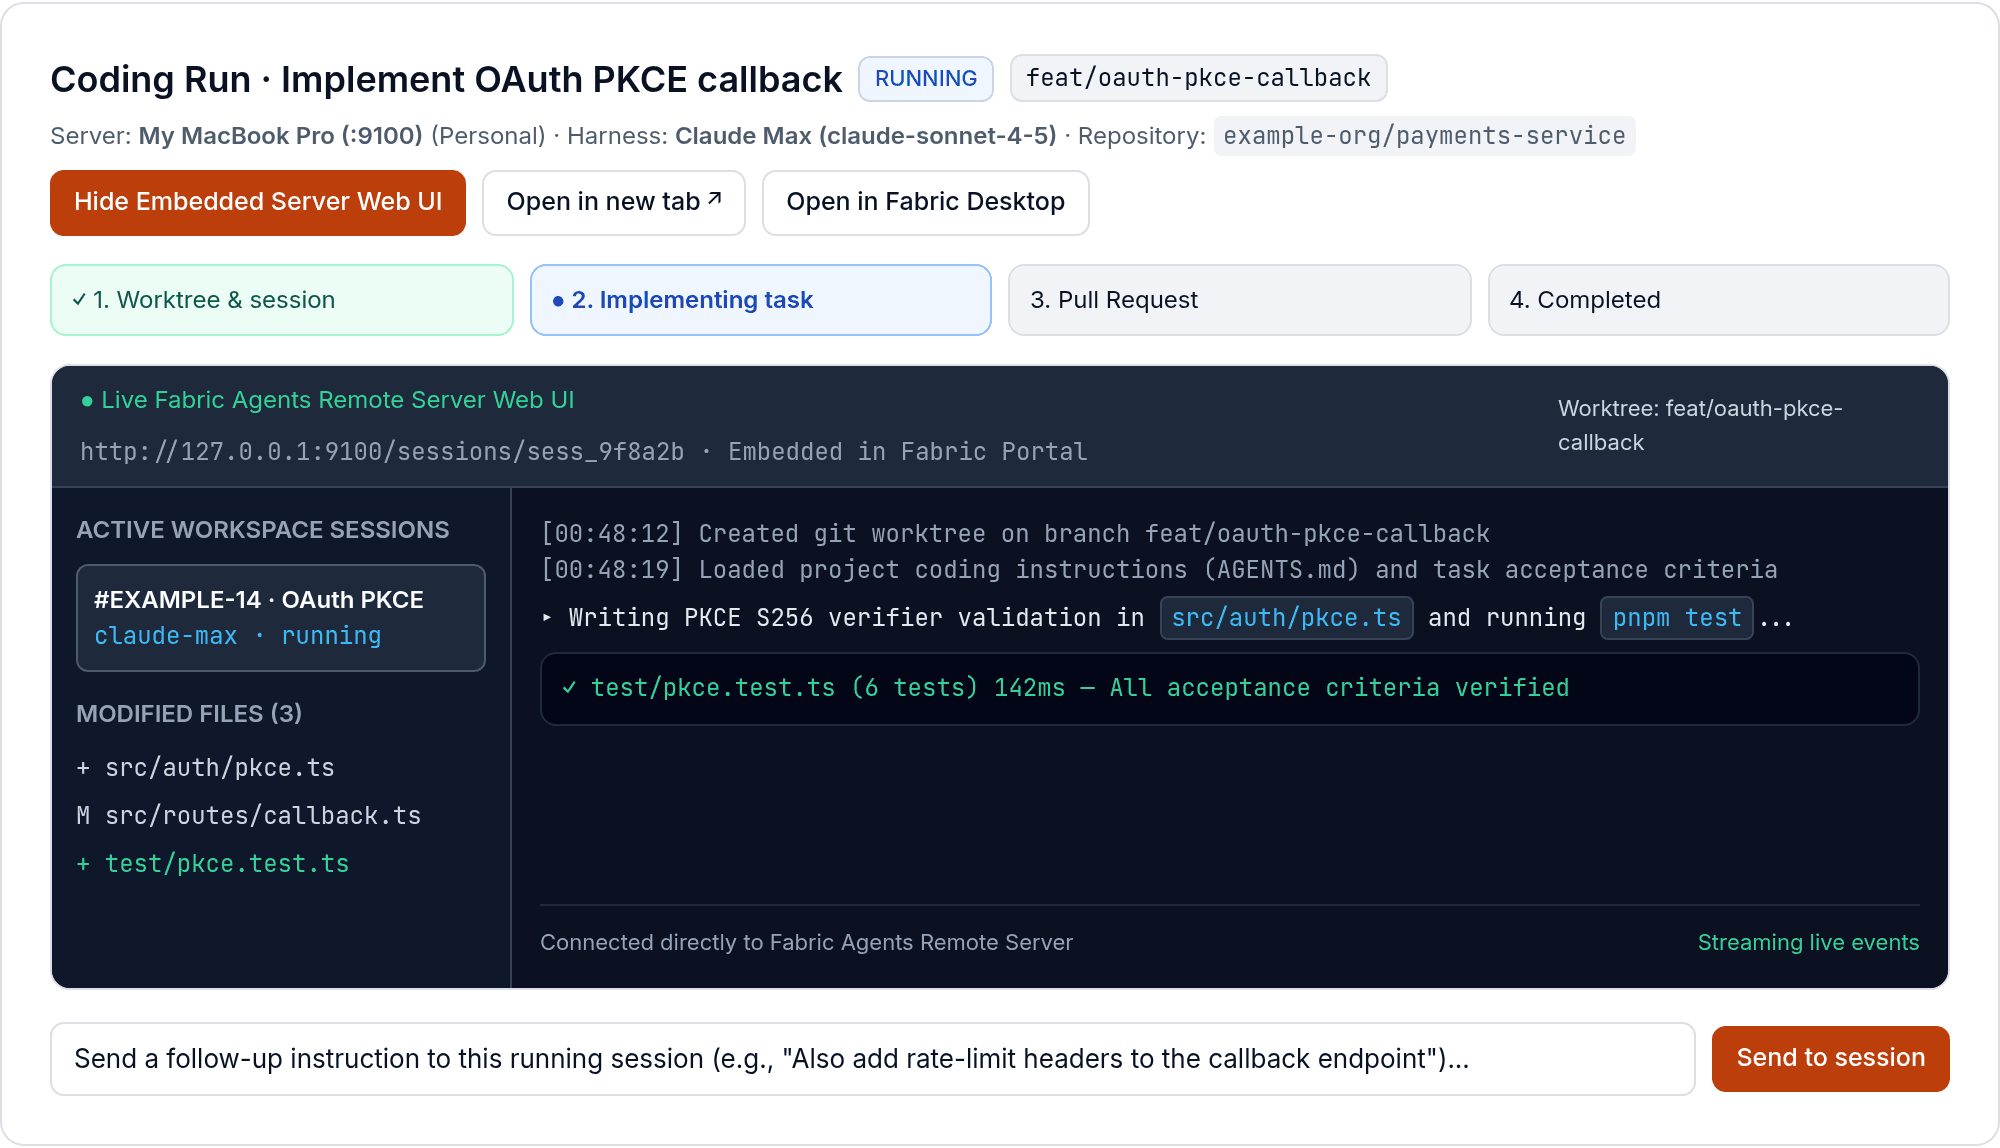
Once a coding run starts, click its status badge to open the Coding Run drawer. You can monitor and interact with the run in two ways without leaving the Fabric Portal:
- Embedded Live Server Web UI (
<iframe />): Click View Live Server Web UI in Portal in the session header (or Delegate to Remote Server → View Web UI in Portal in the project top bar) to embed the realfabric-agent-serverWeb UI directly inside the portal. You can watch real-time file diffs, worktree logs, and active workspace sessions inline, or click Open in new tab for a full-window view. - Live Conversation Stream & Follow-Up Instructions: Below the 4-stage progress stepper (
1. Worktree & session→2. Implementing task→3. Pull Request→4. Completed), Fabric streams the session messages and provides an inline Send to session box so you can send follow-up instructions to the running or completed session.
Best Practices
Project Organization
One project per feature/initiative:
✅ "User Authentication v2"
✅ "Q1 Mobile App Redesign"
✅ "API Rate Limiting Implementation"

❌ "All my PRDs"
❌ "Random documents"
Clear naming:
✅ "[Team] Feature Name - Phase"
   "[Platform] API Gateway - Phase 1"
   "[Mobile] Push Notifications - MVP"

❌ "New project"
❌ "test"
Document Management
- Generate related documents in the same project
- Upload reference materials to the library
- Keep the library clean—remove outdated files
- Use consistent naming for documents
Collaboration
- Set appropriate sharing levels
- Add descriptions for team understanding
- Use activity feed to track changes
- Archive completed projects